
JEE Main Registration Form: Step-by-Step Application Process
Filling out the JEE Main registration form is the official first step toward securing a seat in premier engineering institutions like NITs, IIITs, and CFTIs. While the National Testing Agency (NTA) has streamlined the digital application portal to make registration straightforward, navigating multiple authentication stages, document verification, and academic detail submissions can still feel overwhelming.
To help you submit an error-free application, this comprehensive, step-by-step visual guide walks through every phase of the JEE Main registration process—from initial authentication via DigiLocker to final form submission.
Pre-Requisites Before Starting Your JEE Main Application
Before clicking on the registration link, assemble all mandatory documents and credentials to avoid session timeouts:
- Identity Proof: DigiLocker credentials, Aadhaar Number, PAN Card, or Passport[cite: 8].
- Active Contact Details: A personal email address and mobile number (accessible for OTP verifications).
- APAAR ID (Optional/Recommended): Automated Permanent Academic Account Registry ID, if generated through your school.
- Category & Disability Certificates: Valid SC/ST/OBC-NCL/Gen-EWS or PwD/PwBD certificates issued by authorized government authorities (if applicable).
- Emergency Contact Information: Mobile number and email address of a parent or guardian.
Phase 1: Authentication & Meri Pehchaan / DigiLocker Verification
NTA incorporates single sign-on authentication through Meri Pehchaan and DigiLocker to establish a verified identity profile right at the registration onset.
Step 1: Sign In via DigiLocker / Meri Pehchaan
Navigate to the official JEE Main registration portal. You will be prompted to authenticate your identity via DigiLocker or Meri Pehchaan using your Mobile Number, Username, or Other IDs (Aadhaar, PAN, or Driving License).
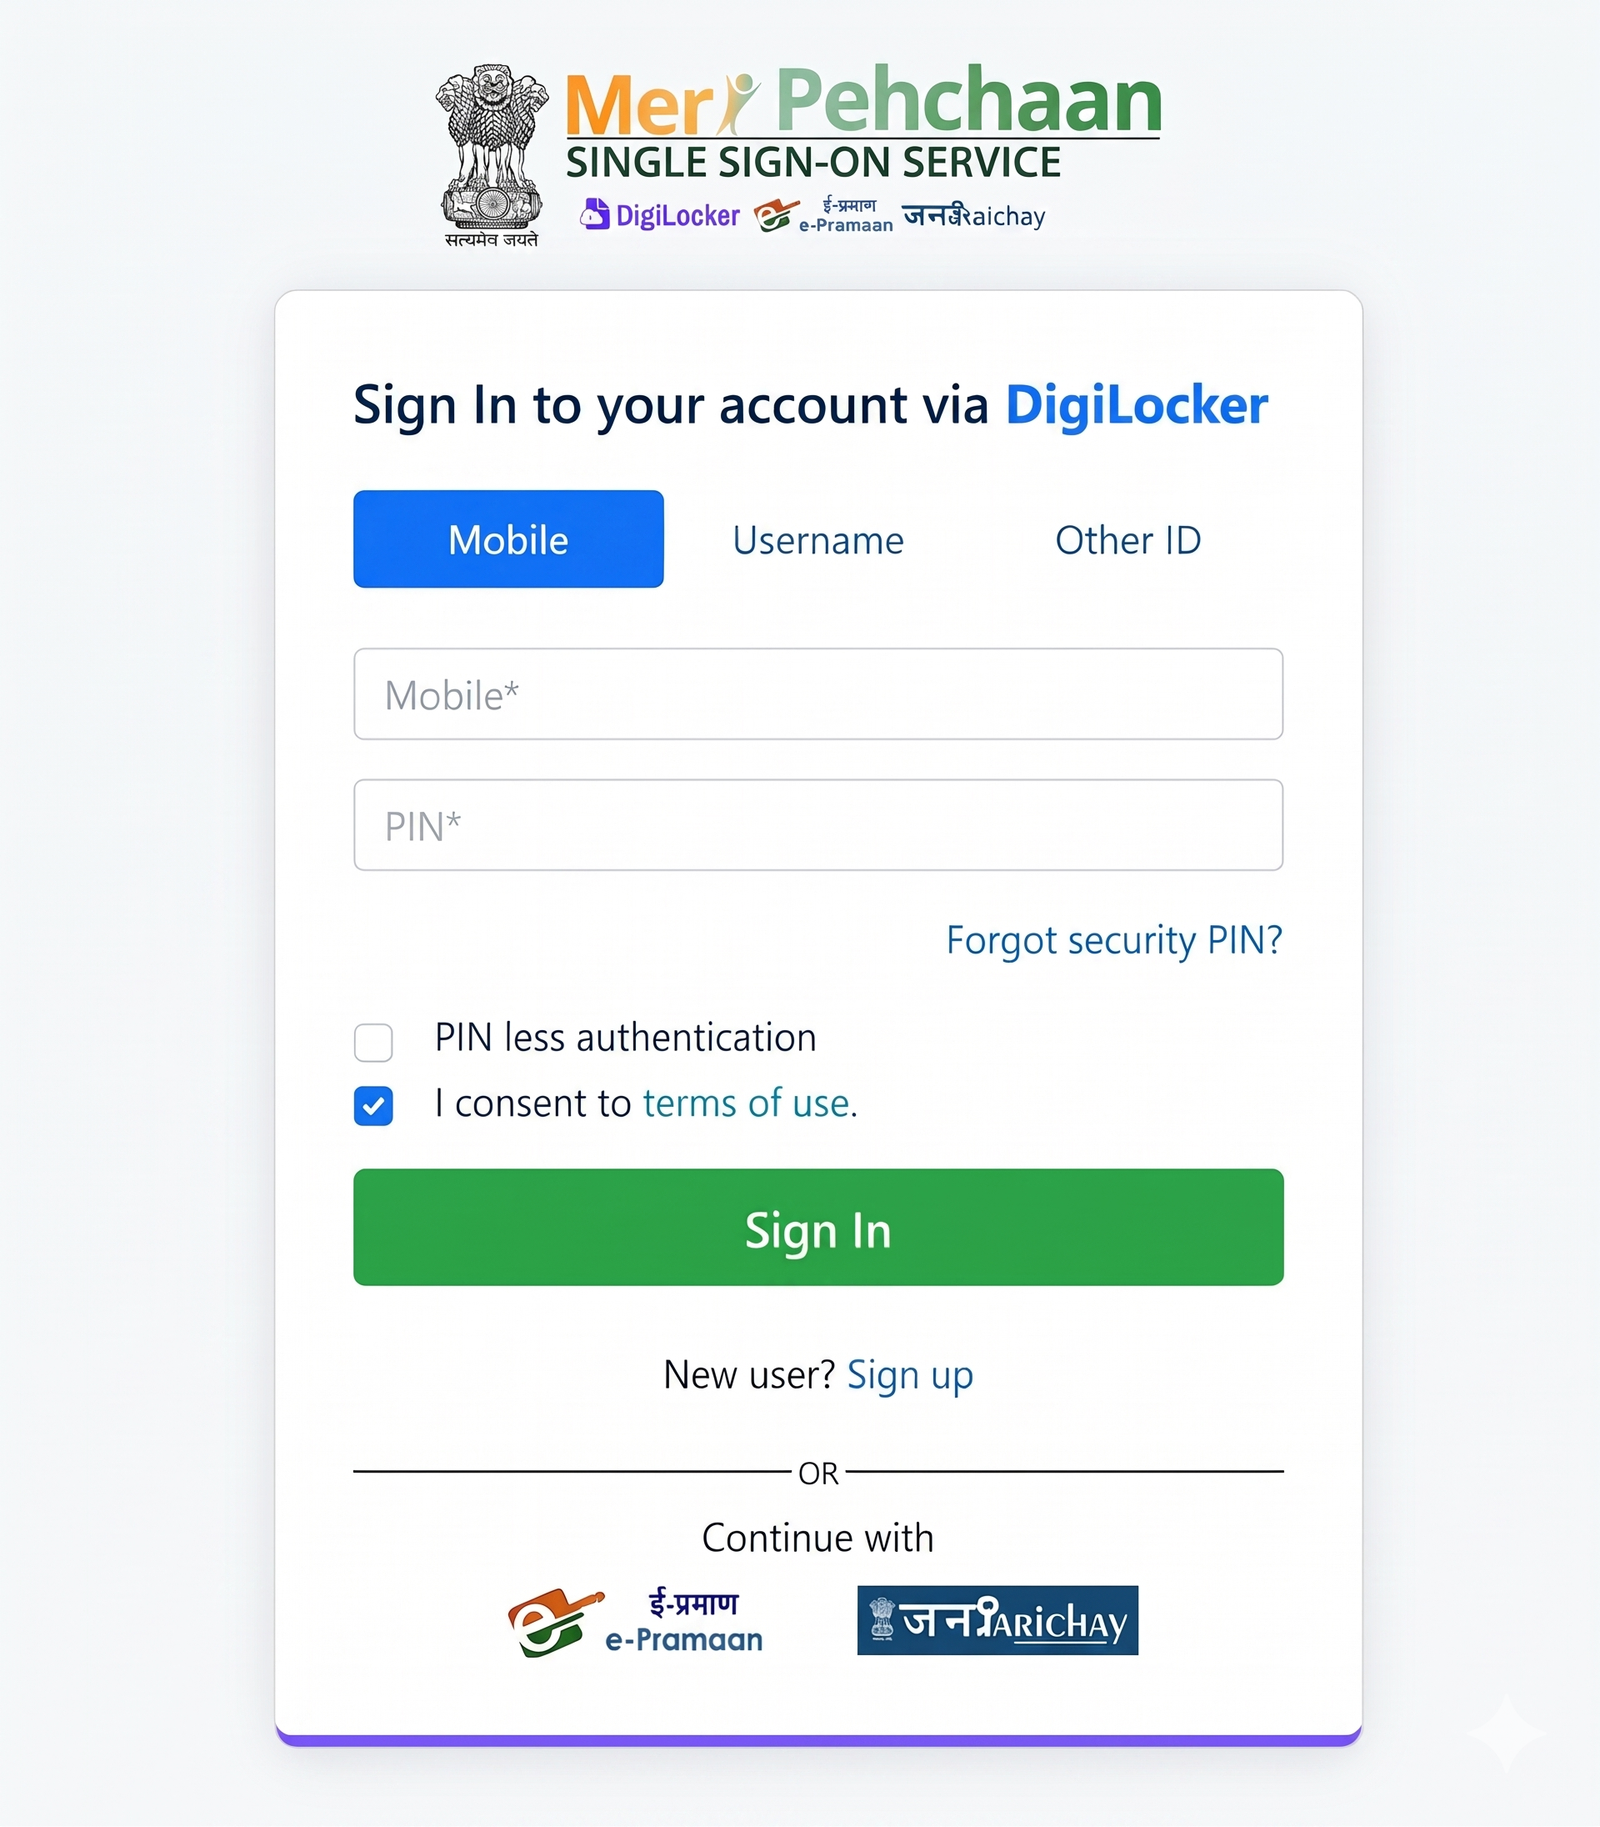
Meri Pehchaan verification screen for single sign-on authentication.
If logging in with a mobile number linked to multiple accounts, select your profile, enter your PIN, and submit the OTP sent to your registered phone.
Step 2: Granting Consent & Identity Processing
After authenticating, DigiLocker will display a consent request screen. Review the profile details and click "Allow" to share your verified identity records with the National Testing Agency (NTA).
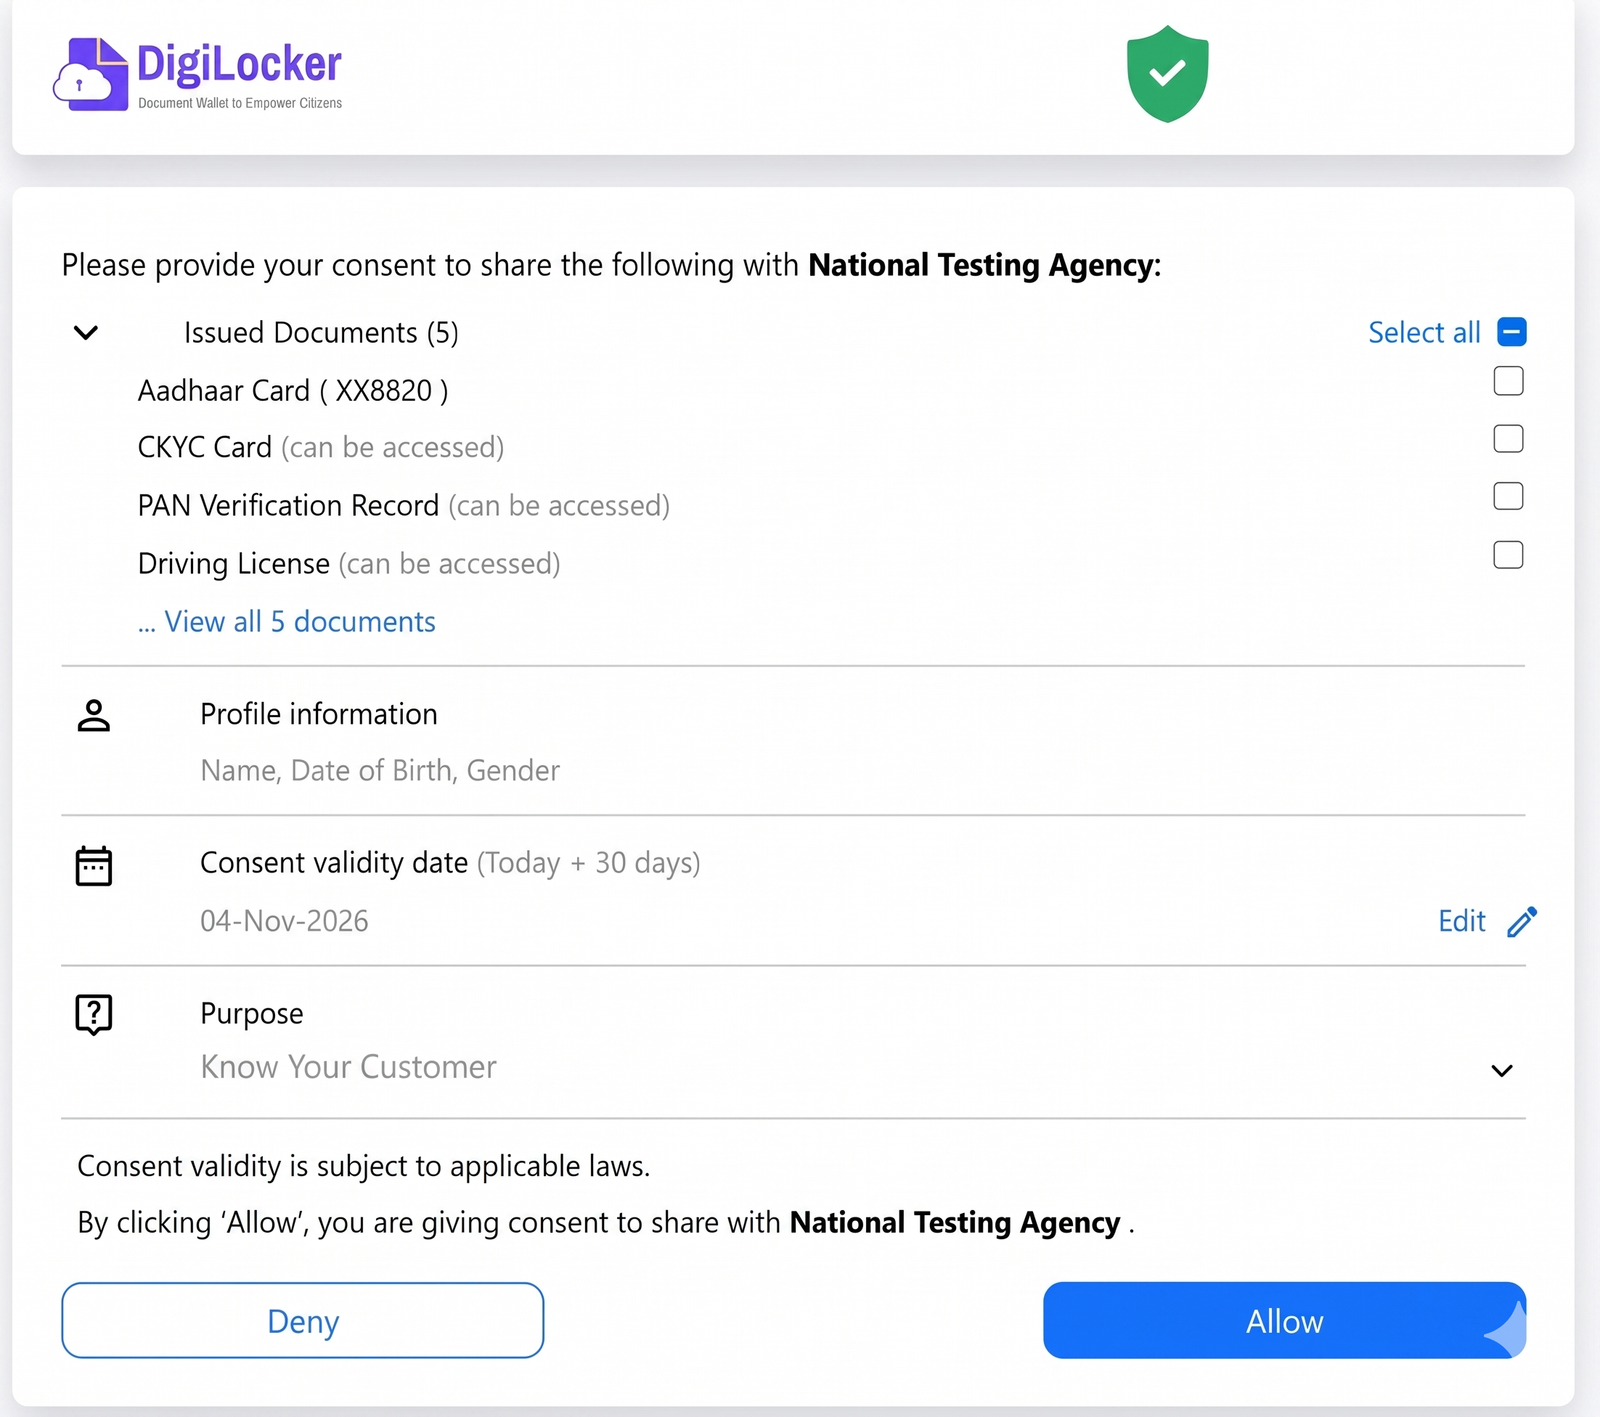
DigiLocker consent granting interface for identity data sharing.
Once the identity authentication shows "Successfully Completed," click "Proceed for Registration" to access the application dashboard.
Phase 2: Basic Registration & Personal Profile Setup
Step 3: Enter Personal & Communication Address Details
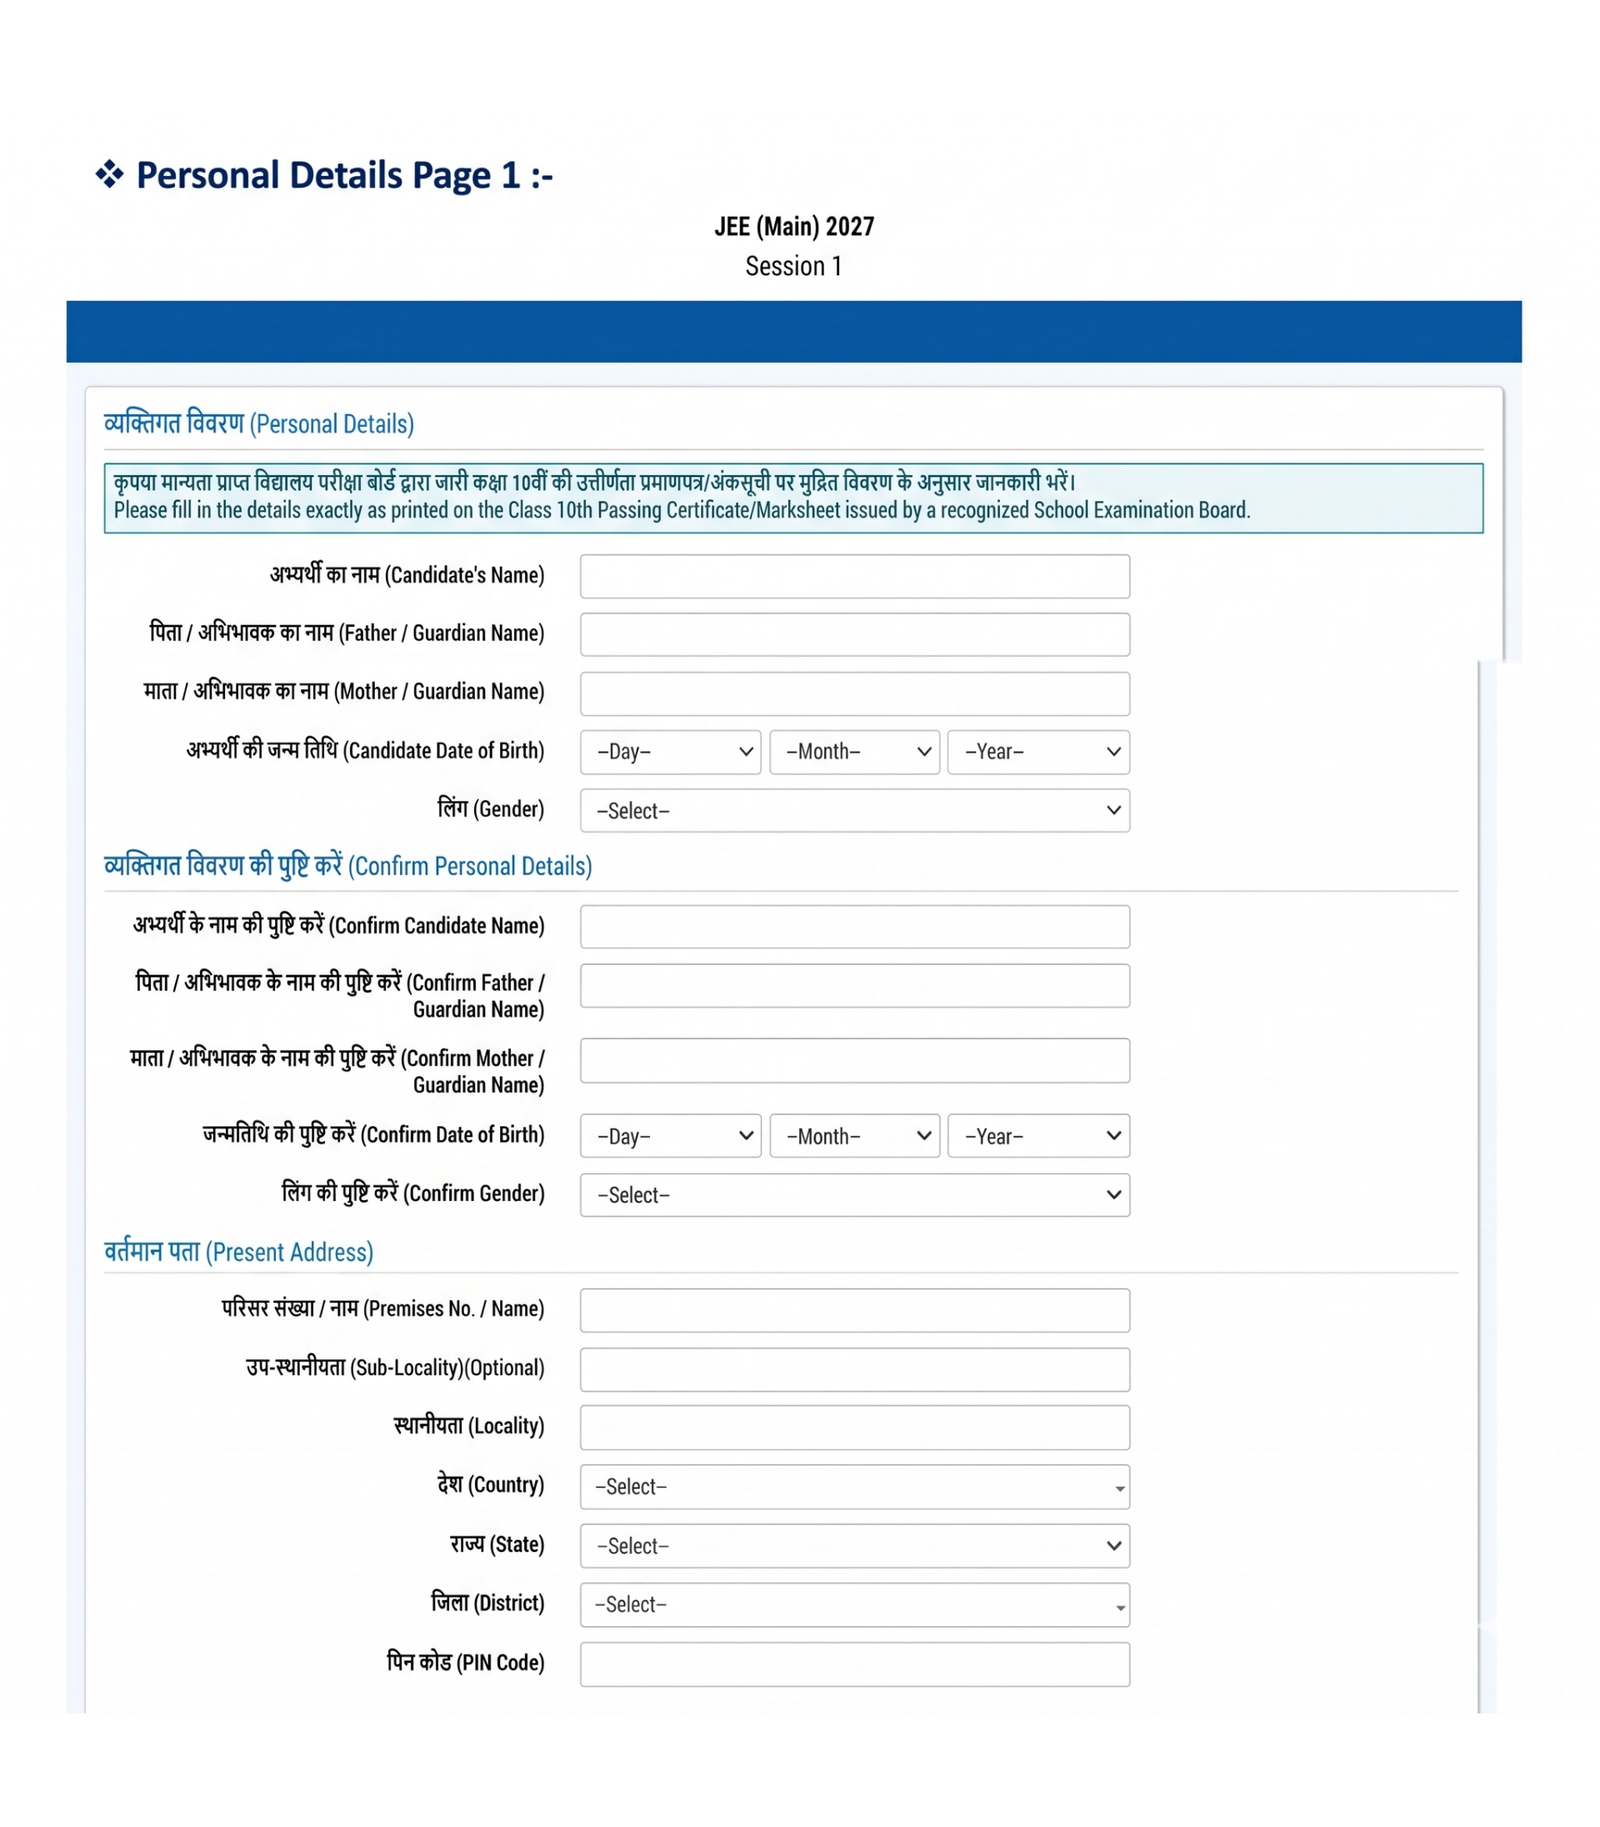
Enter your Candidate Name, Father’s/Mother’s Name, Date of Birth, and Gender strictly as recorded in your Class 10th Passing Certificate, along with your address and email/mobile verification details.
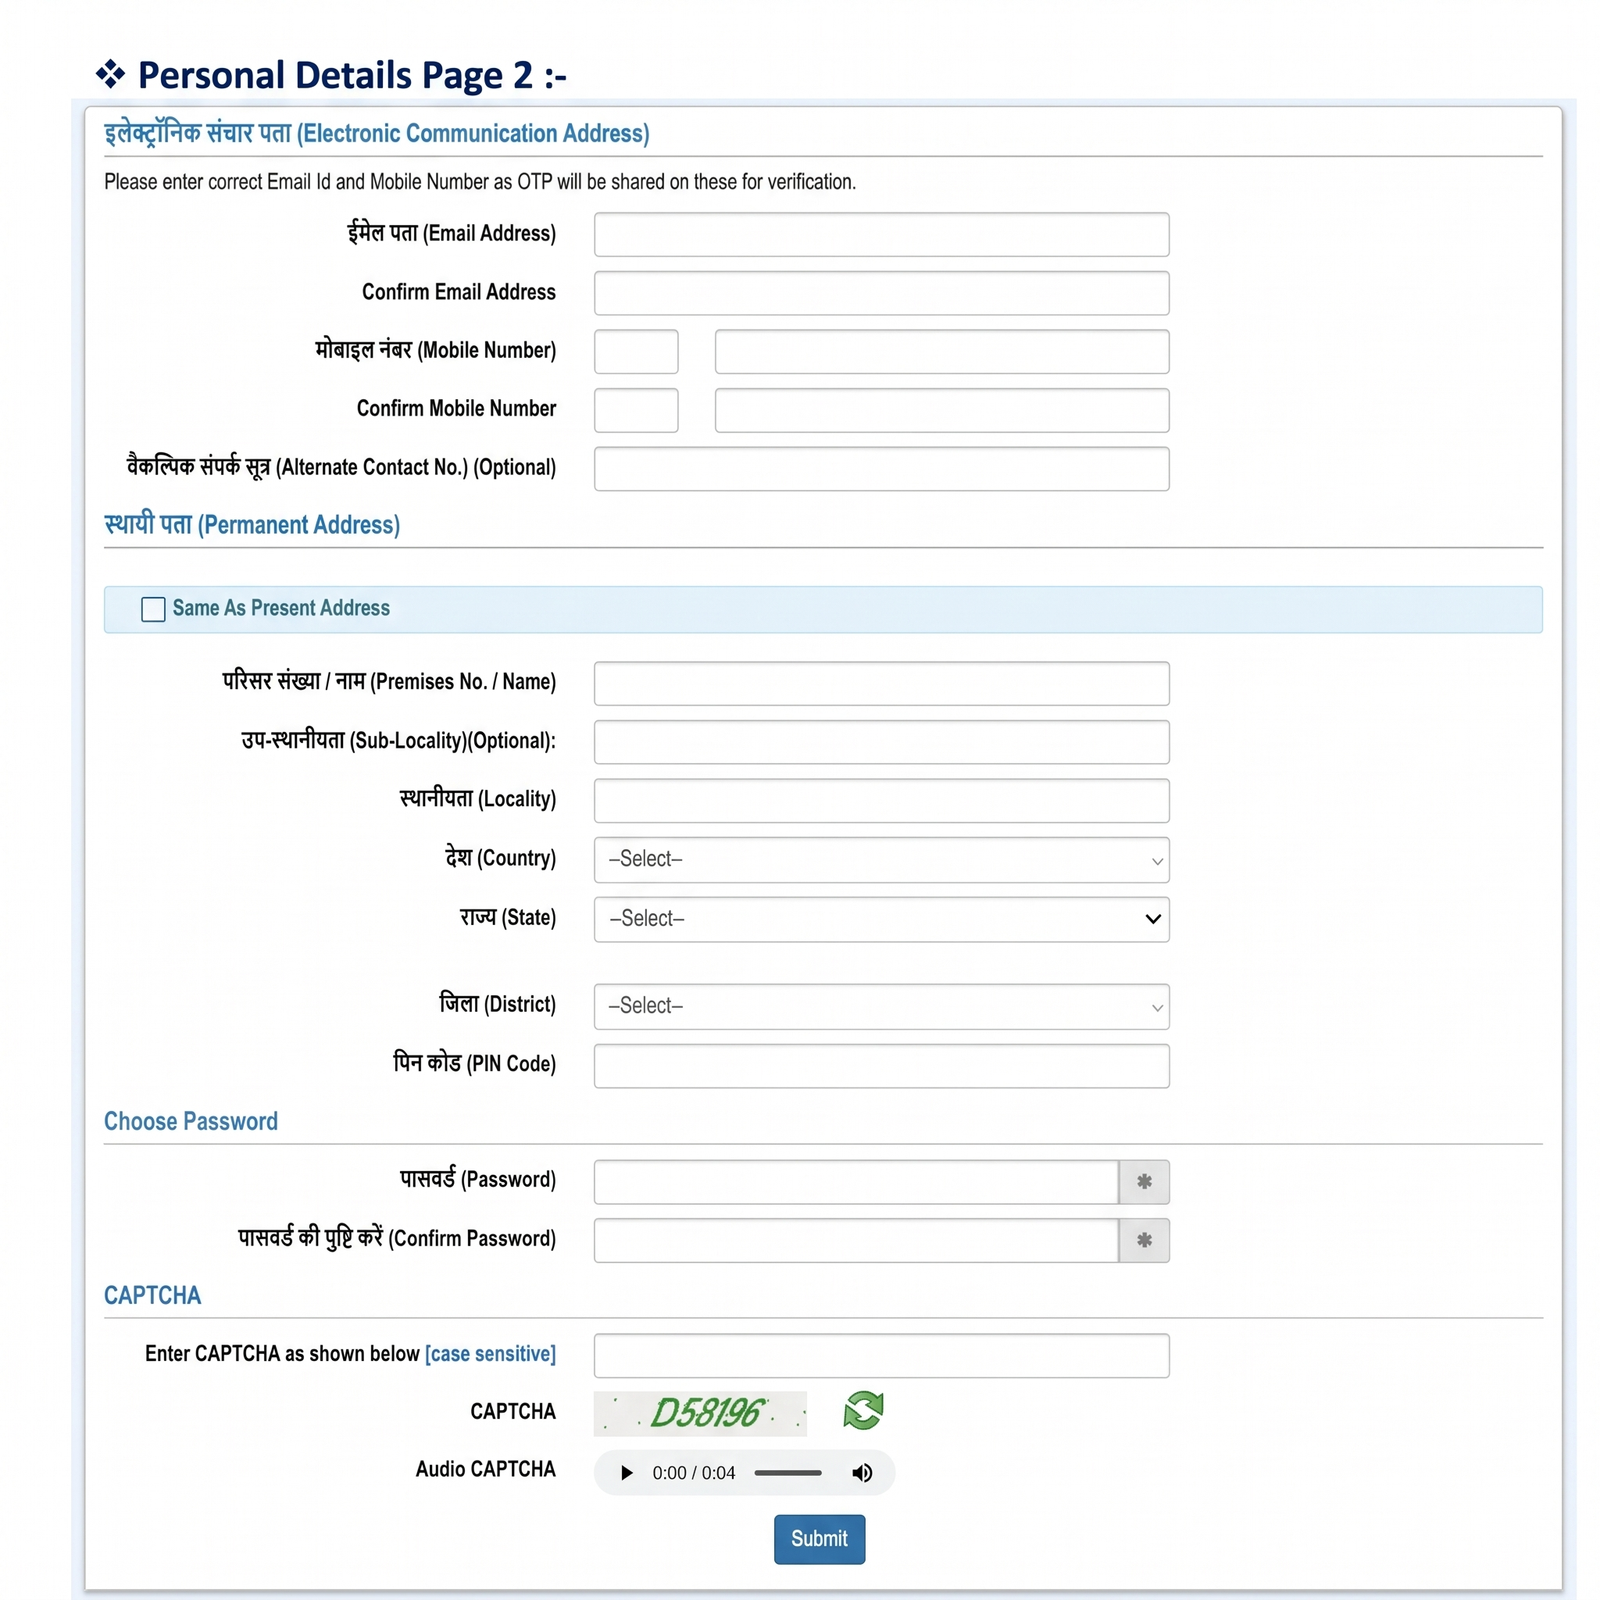
Form fields for candidate personal details, present address, and electronic communication address[cite: 3].
Step 4: Security Credentials & OTP Verification
Create a secure password, complete the CAPTCHA, and review your data on the review summary screen before requesting and verifying the One-Time Password (OTP) sent to your registered phone.
Application form submission alert and candidate dashboard home page[cite: 4].
Phase 3: Detailed Application Form Filling
Step 5: Comprehensive Personal & Category Details
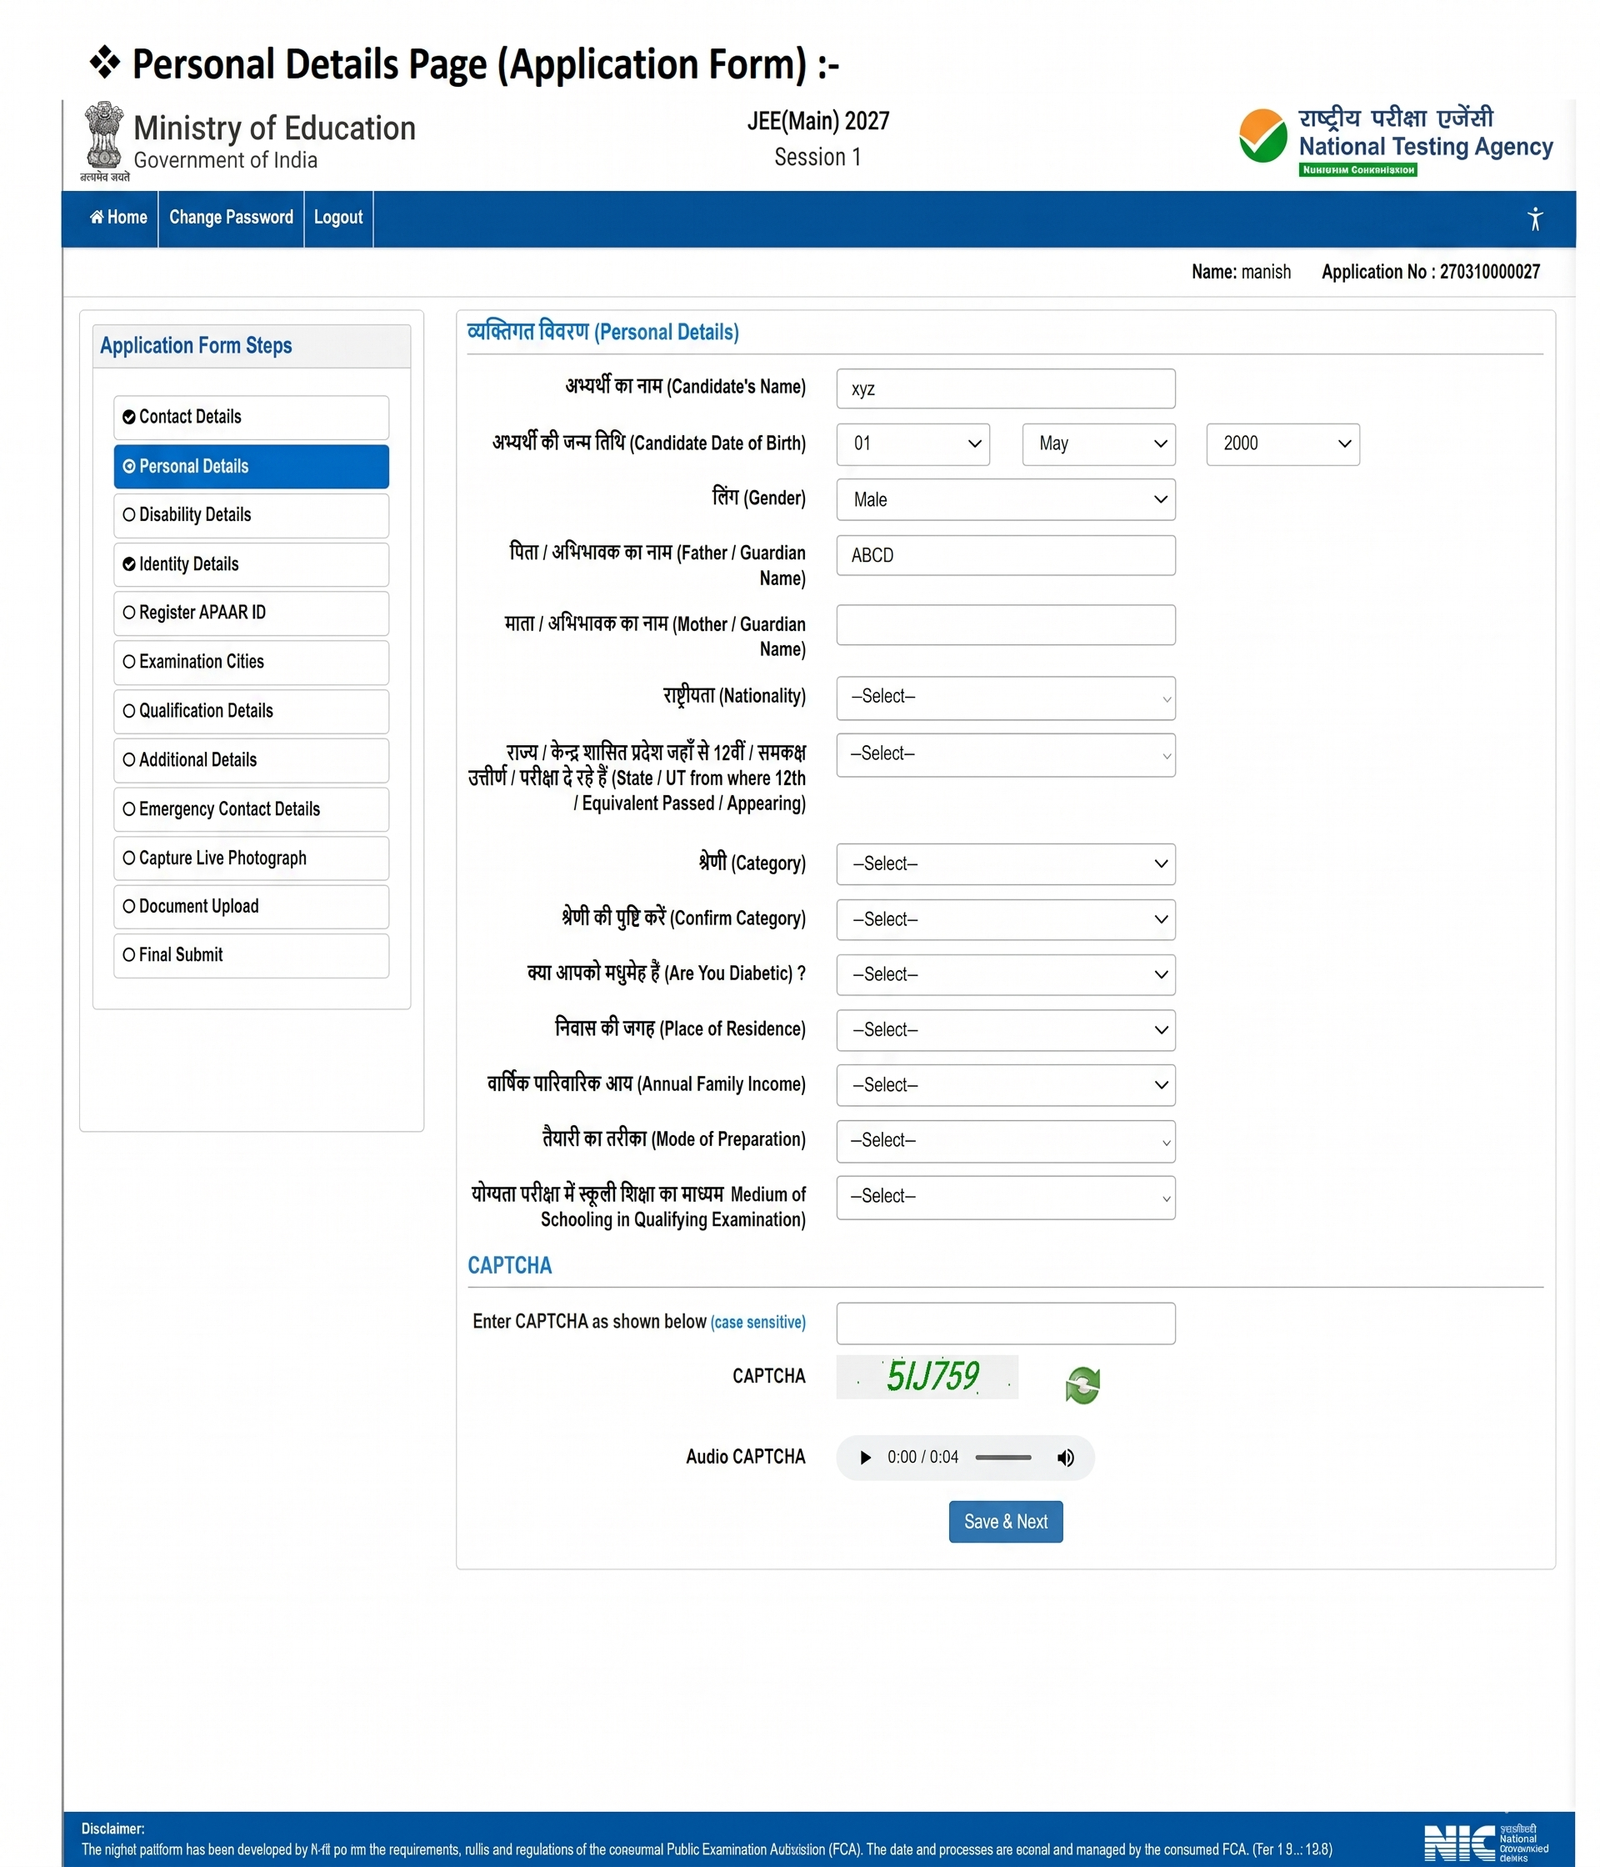
Confirm your Nationality, State of Eligibility, Category, and Mode of Preparation. If you select SC, ST, or OBC-NCL, specific certificate details will be requested.
Personal details form page highlighting category certificate requirements and PwD/PwBD details[cite: 5].
Step 6: PwD / PwBD Disability & Scribe Details
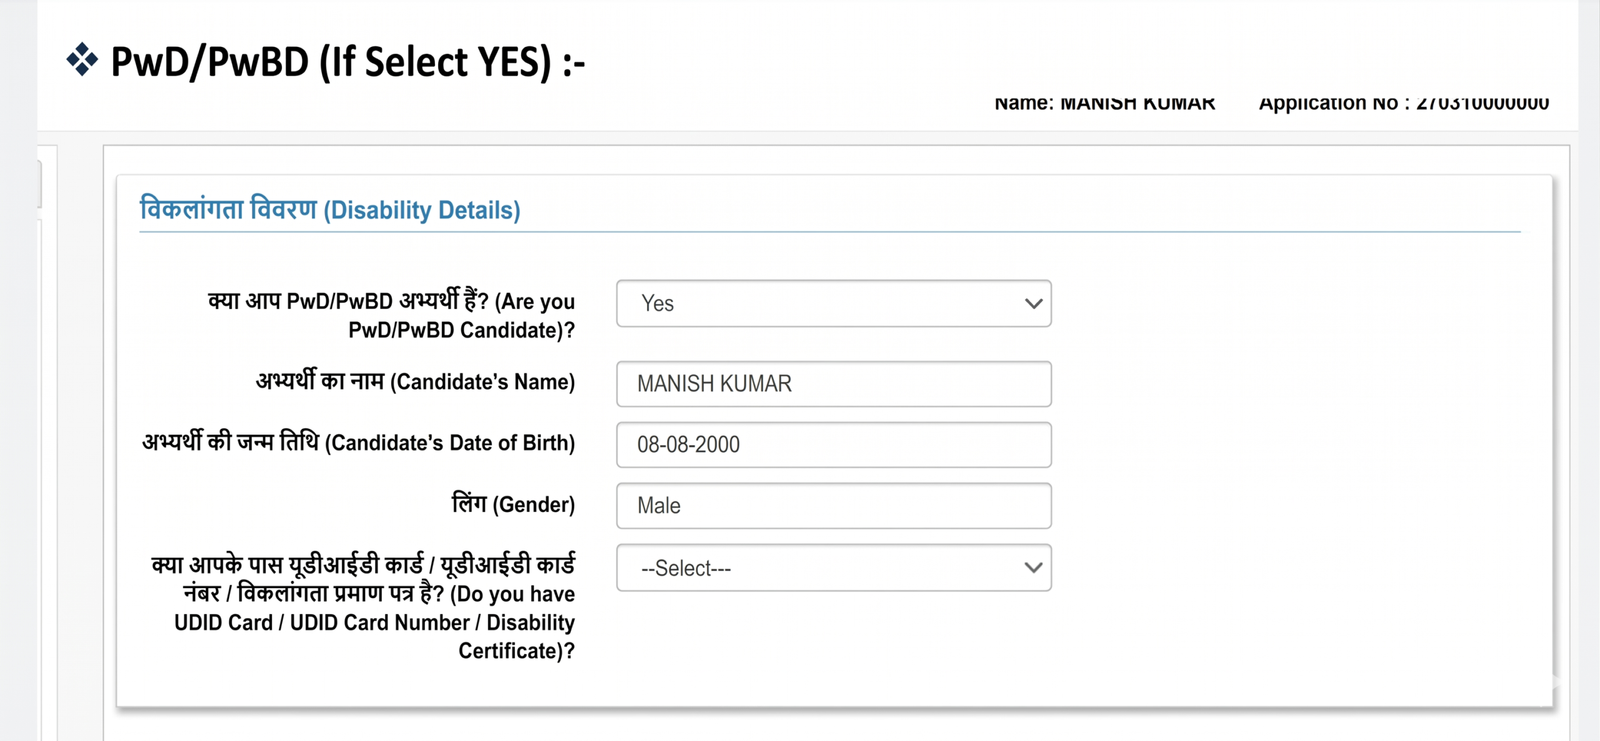
If you select "Yes" under PwD/PwBD status, relevant disability categories, UDID card info, and scribe requirements will render dynamically.
Disability detail fields for PwD/PwBD candidates, including UDID card options[cite: 6].
Phase 4: Exam Centers & Emergency Contacts
Step 7: APAAR ID & Exam Center Selection
Provide your APAAR ID if available, then proceed to select your examination papers (Paper 1, Paper 2A, Paper 2B), medium, and four city preferences.
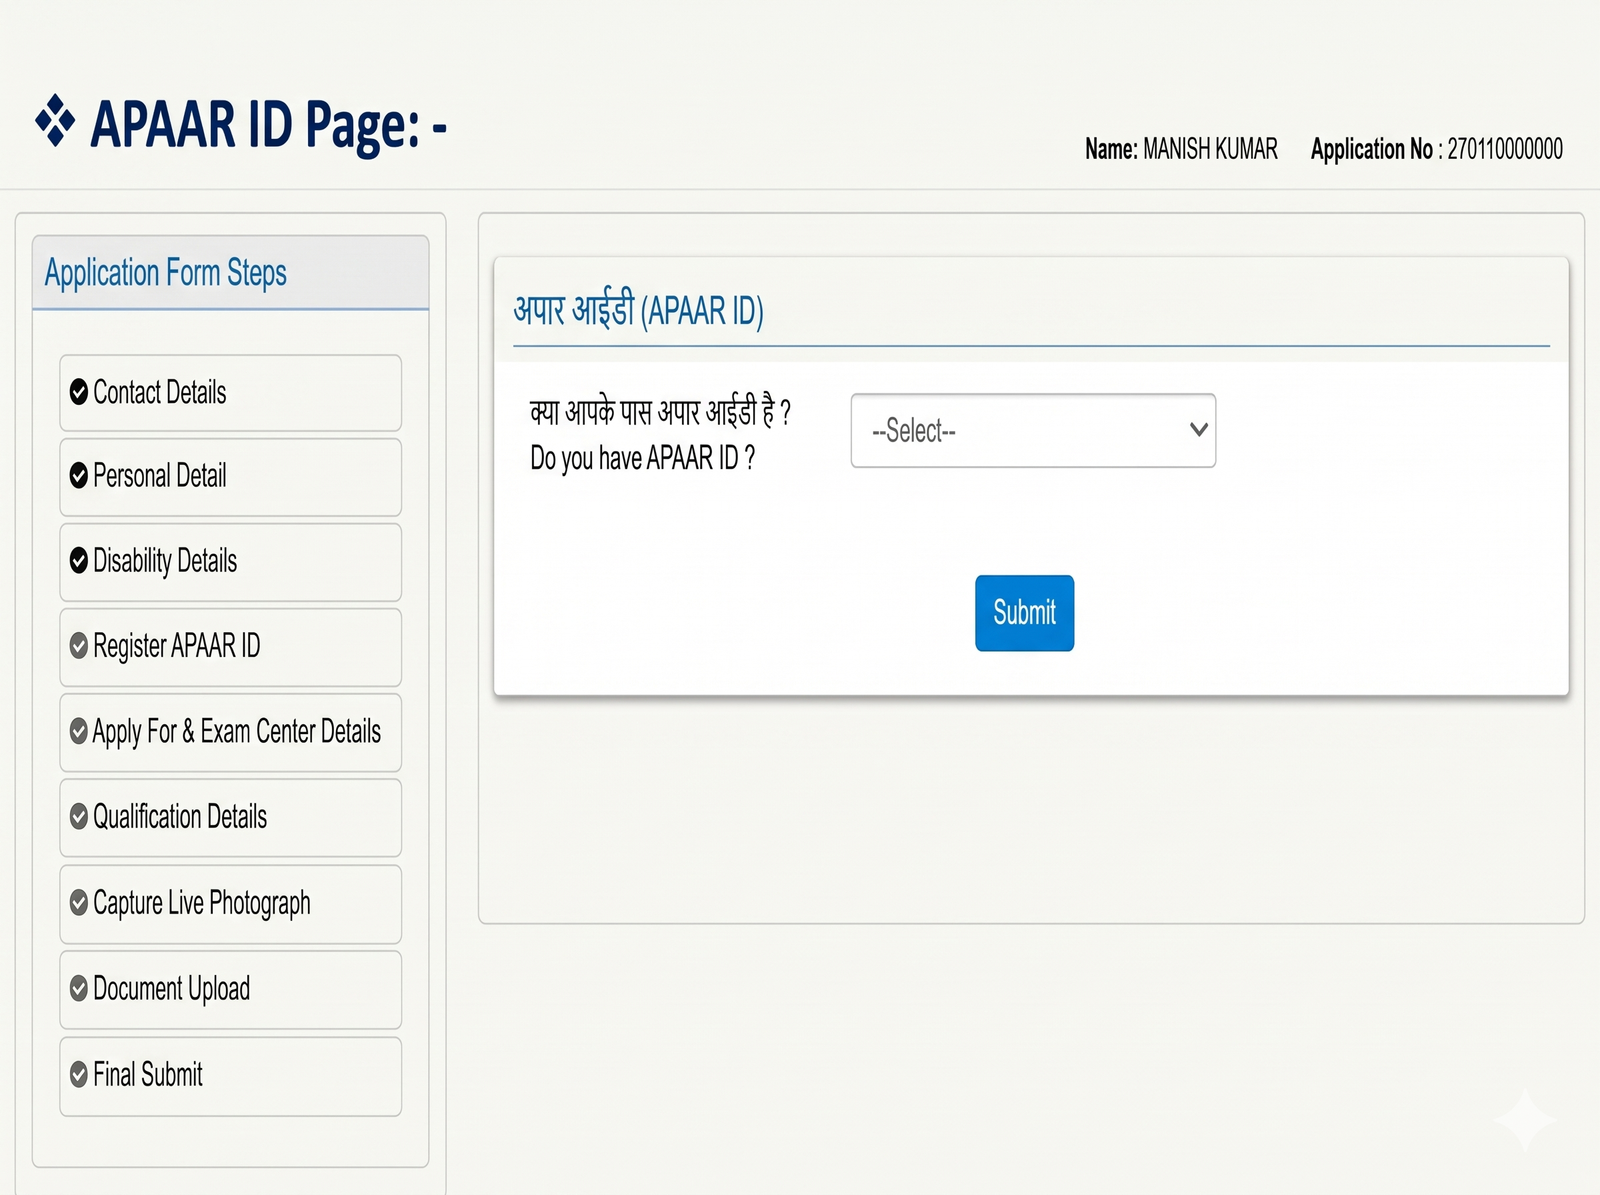
Applying for specific papers and choosing preferred examination cities[cite: 9].
Step 8: Qualification Details & Emergency Contacts
Complete your Class 10th and 12th academic entries, enter your birthplace details, and verify your parents' or guardians' emergency contact info via dual OTP verification.
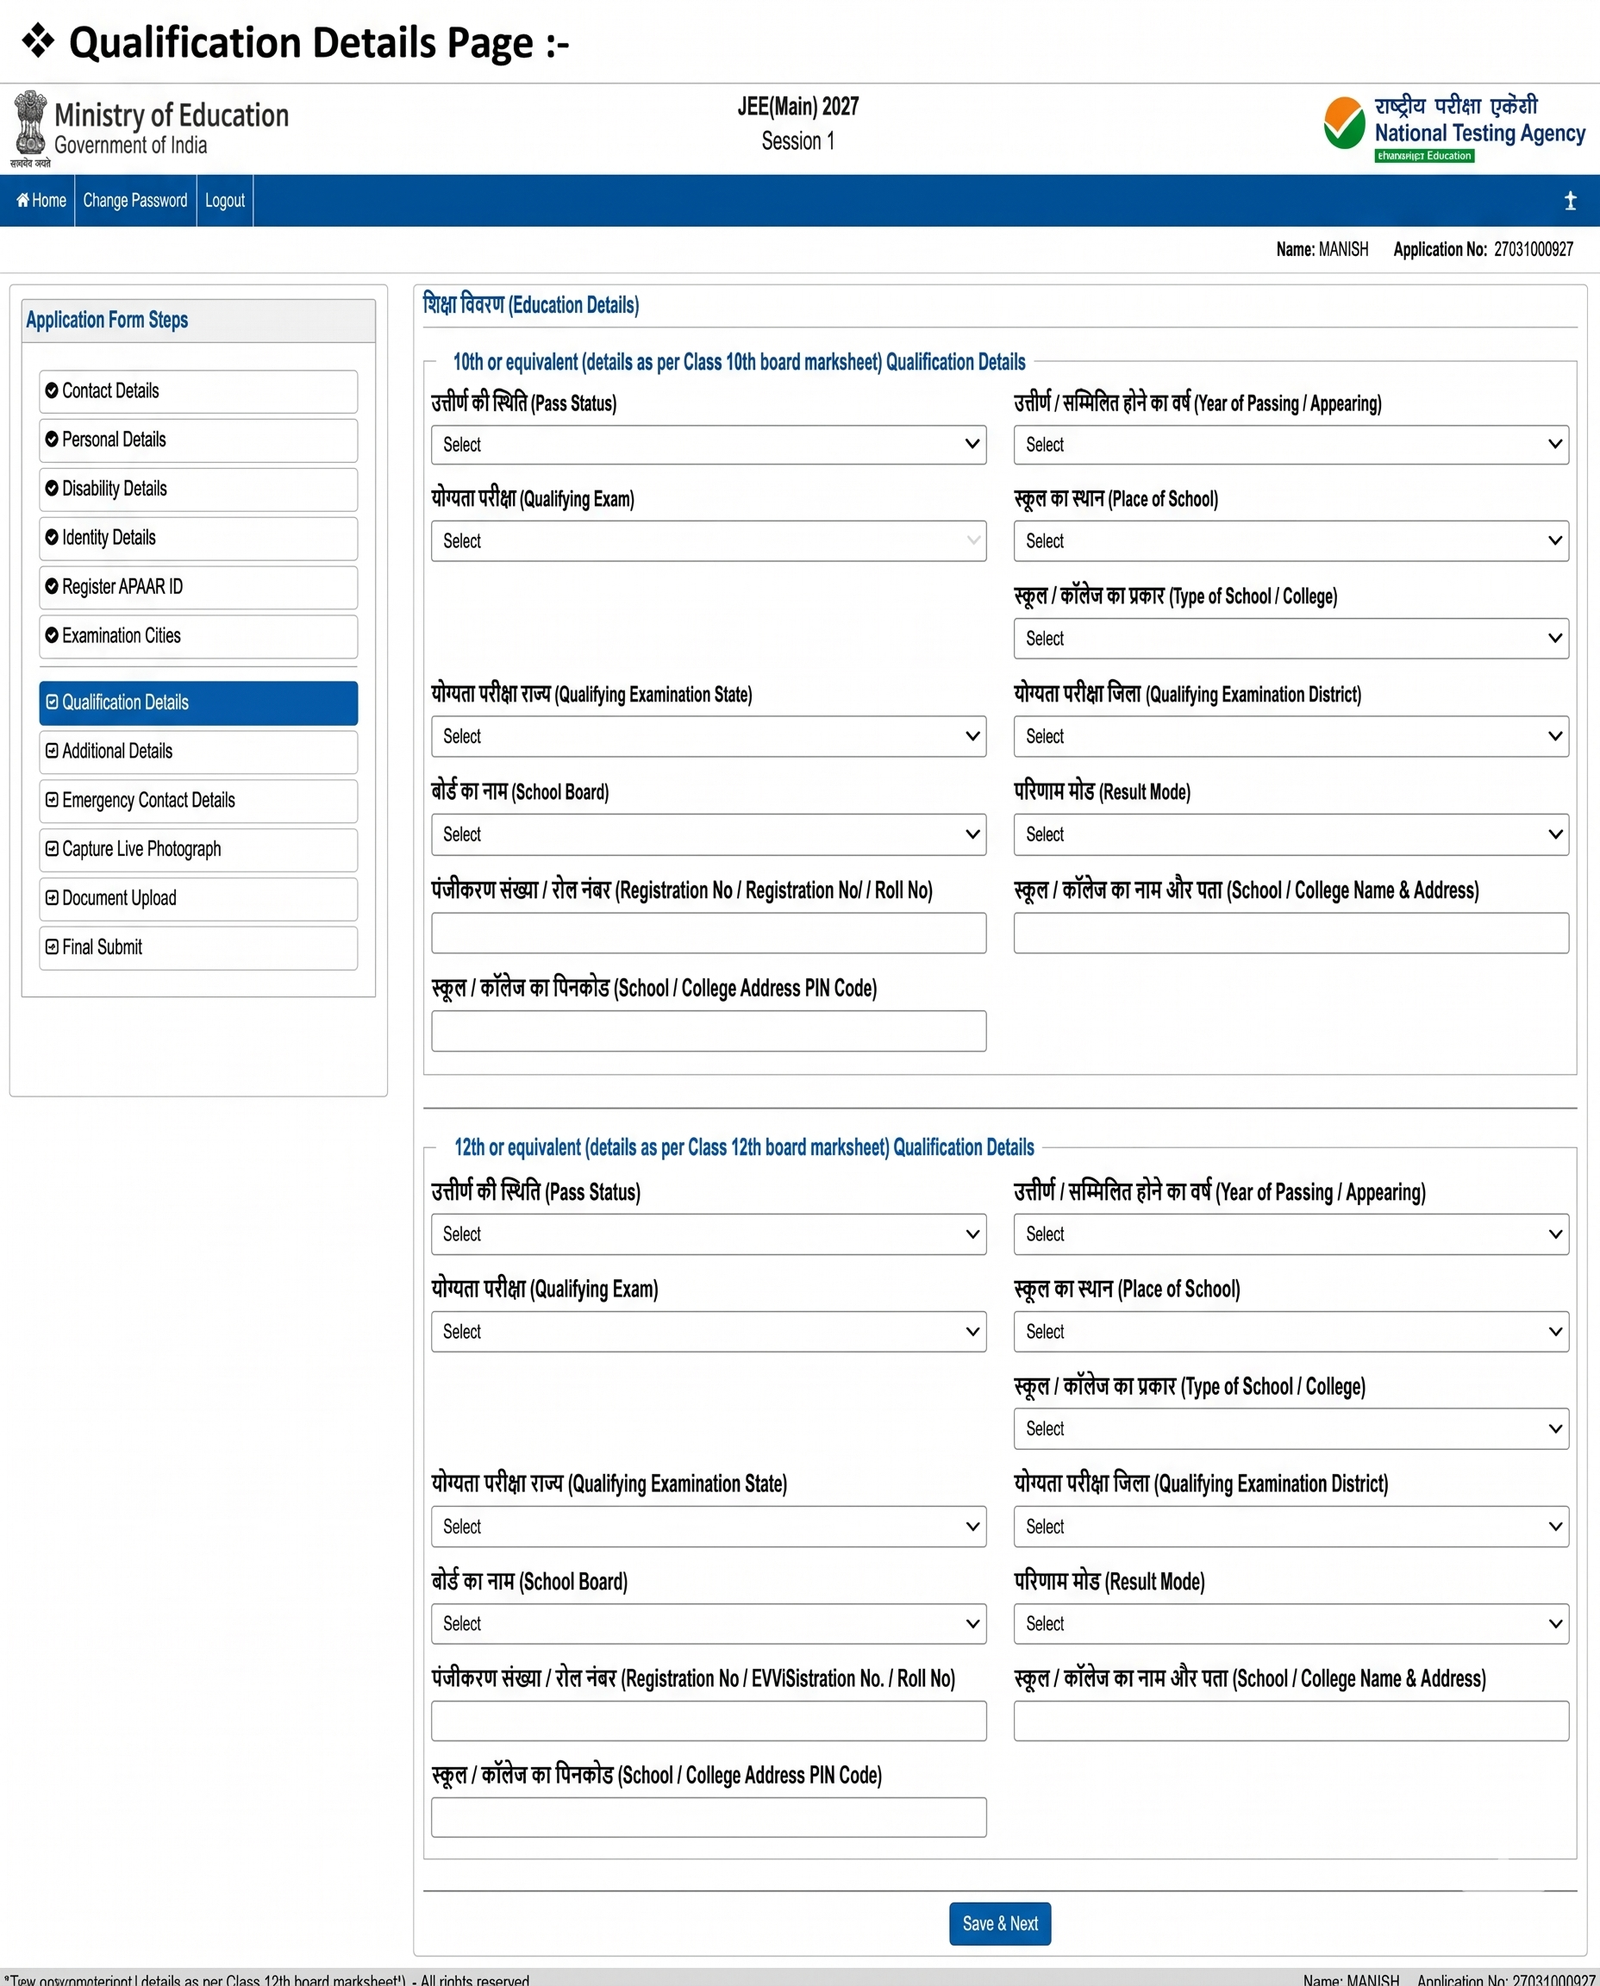
Emergency contact input fields and dual OTP verification interface[cite: 10].
Phase 5: Document Uploads, Review & Fee Payment
Step 9: Live Photograph Capture & Document Uploads
Follow the portal instructions carefully to capture your live photograph using your webcam or mobile device (via QR code scan). Ensure proper lighting and a plain background. Upload scanned files for your signature and category documents as per the specified dimensions.
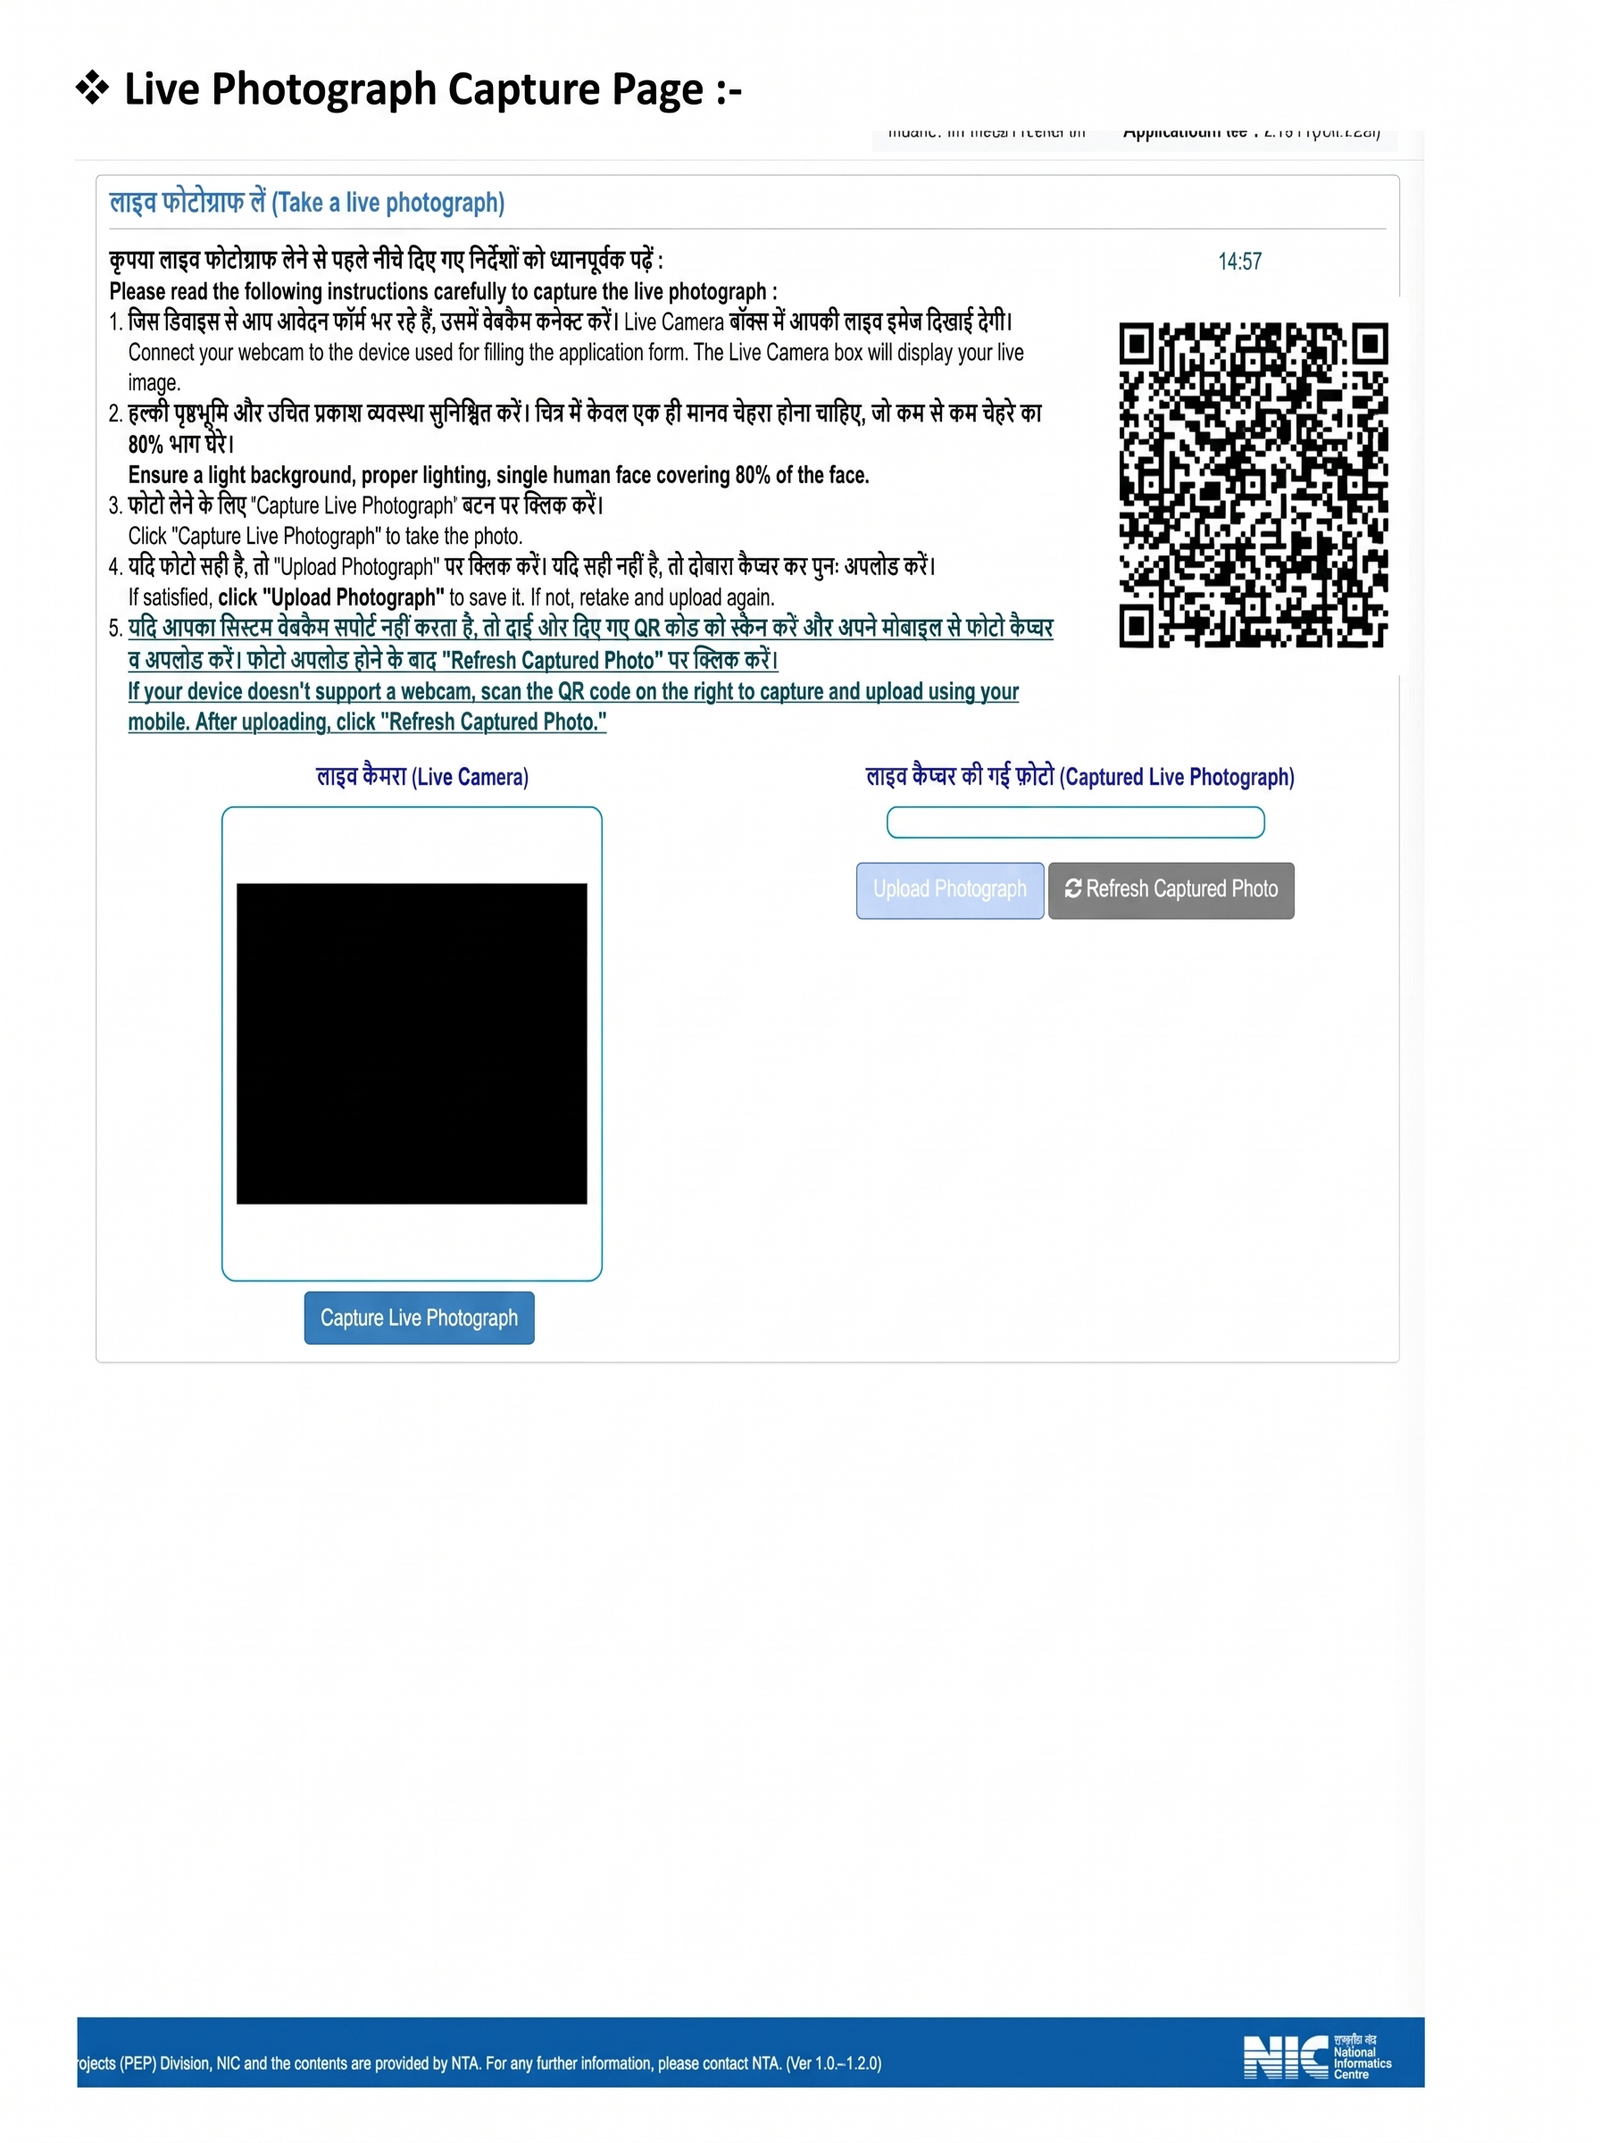
Live photograph capture interface with webcam preview and mobile QR code fallback options.
Step 10: Application Review & Particulars Verification
Carefully review all your entered particulars on the review summary screen. Check your name, date of birth, category, paper selection, and exam cities before hitting final submission. Note that once submitted, changes cannot be made without an official correction window.
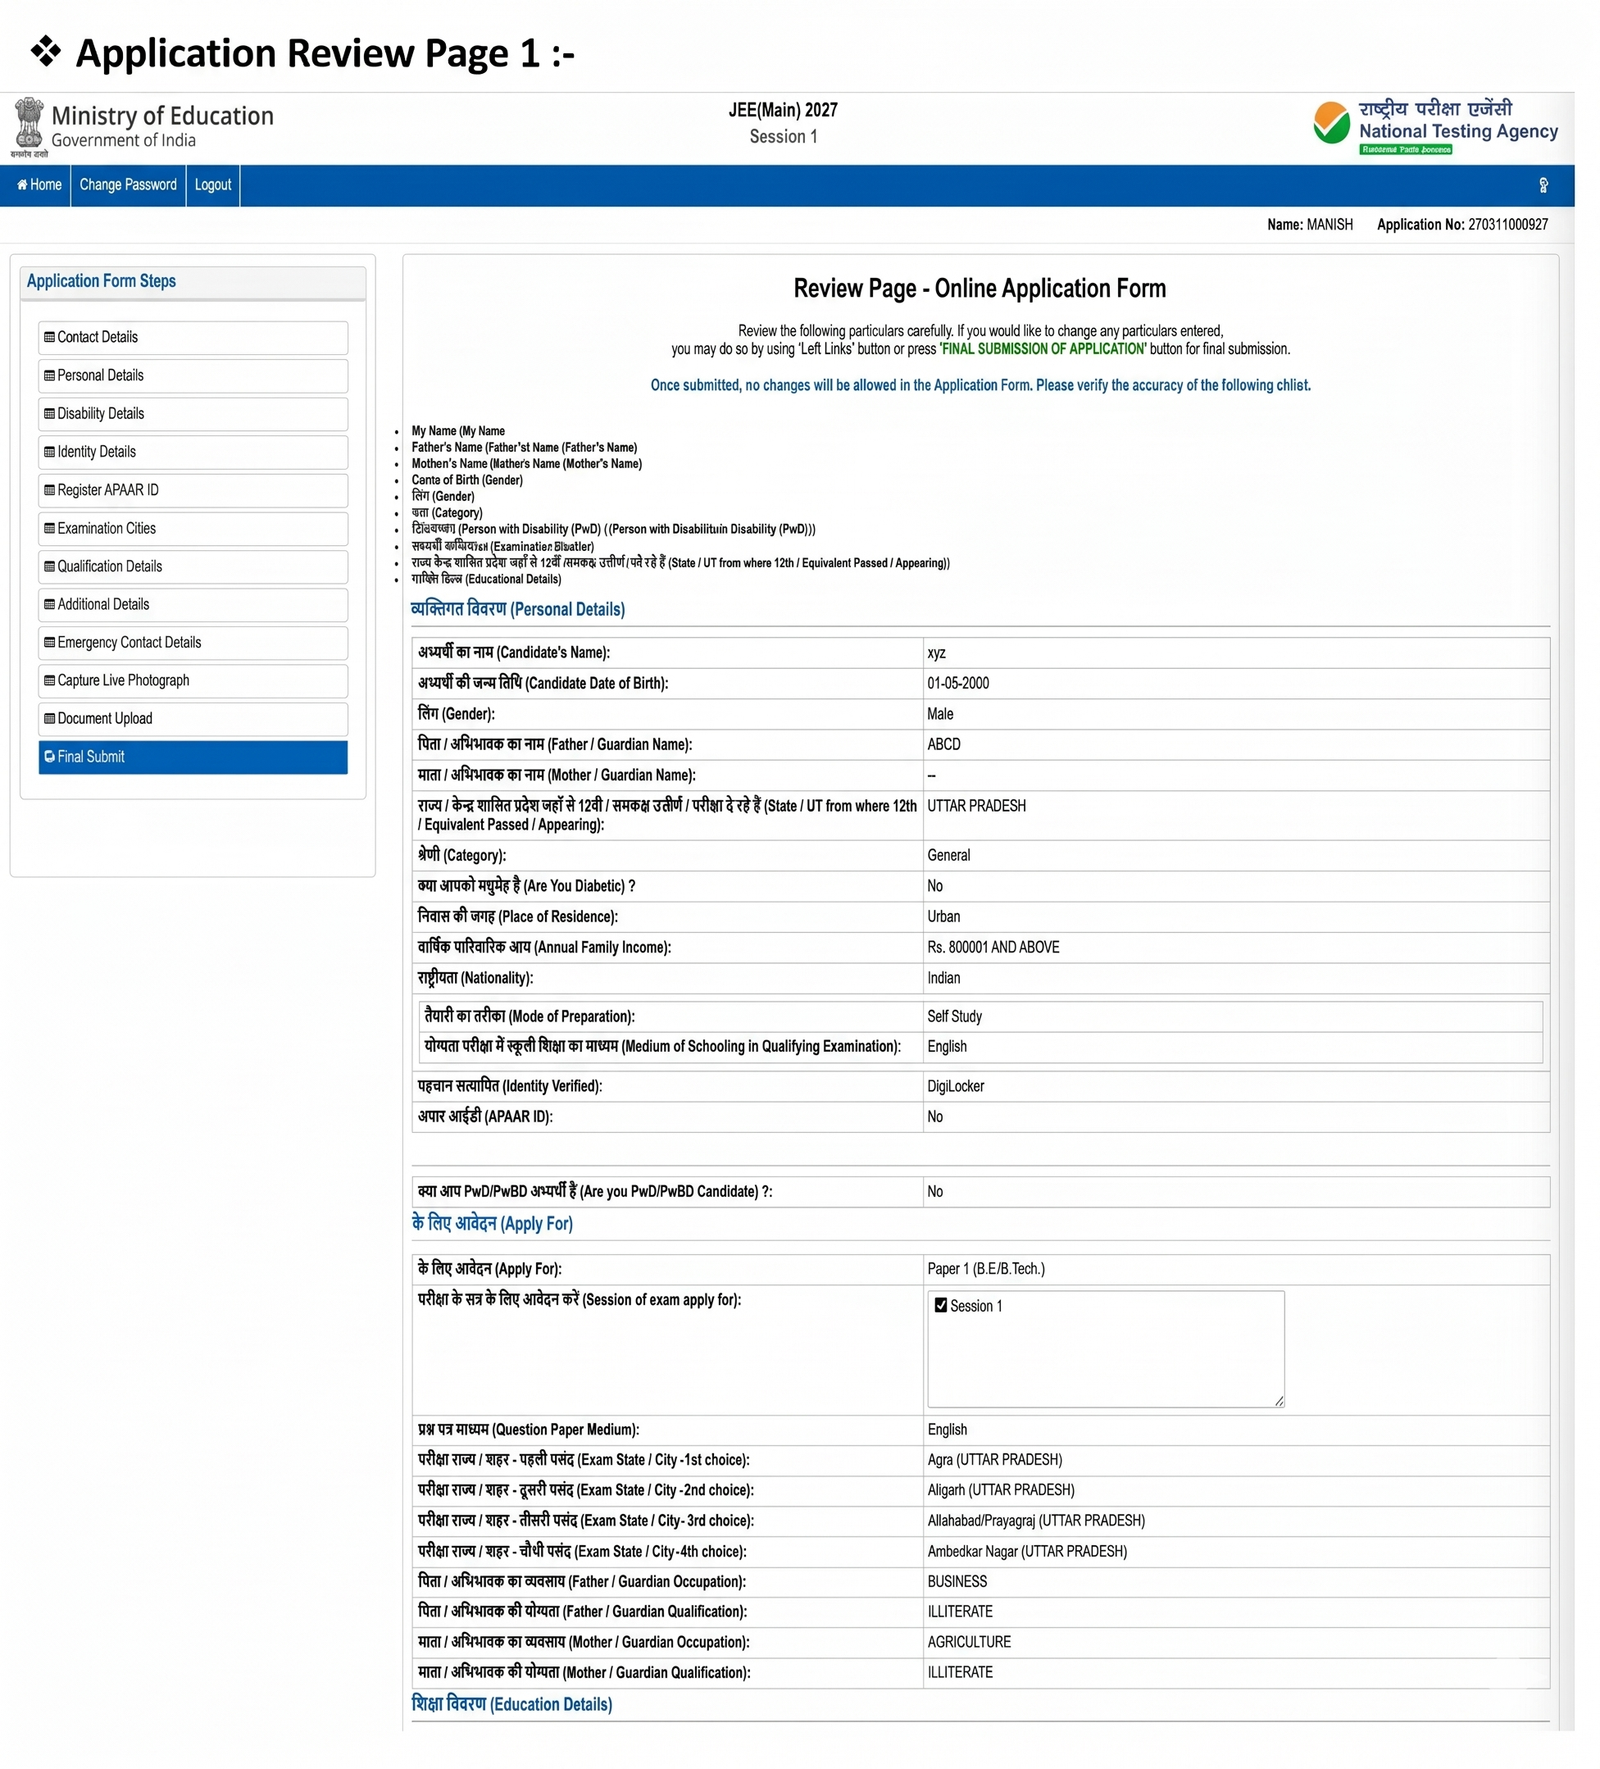
Complete application preview page for verifying personal, academic, and exam preferences prior to final submission.
Step 11: Examination Fee Payment & Final Confirmation
After final submission, proceed to pay the required application fee through the online payment gateway (Net Banking, UPI, Credit Card, or Debit Card). Your registration is only complete once the fee transaction is successfully processed and the confirmation page is generated.
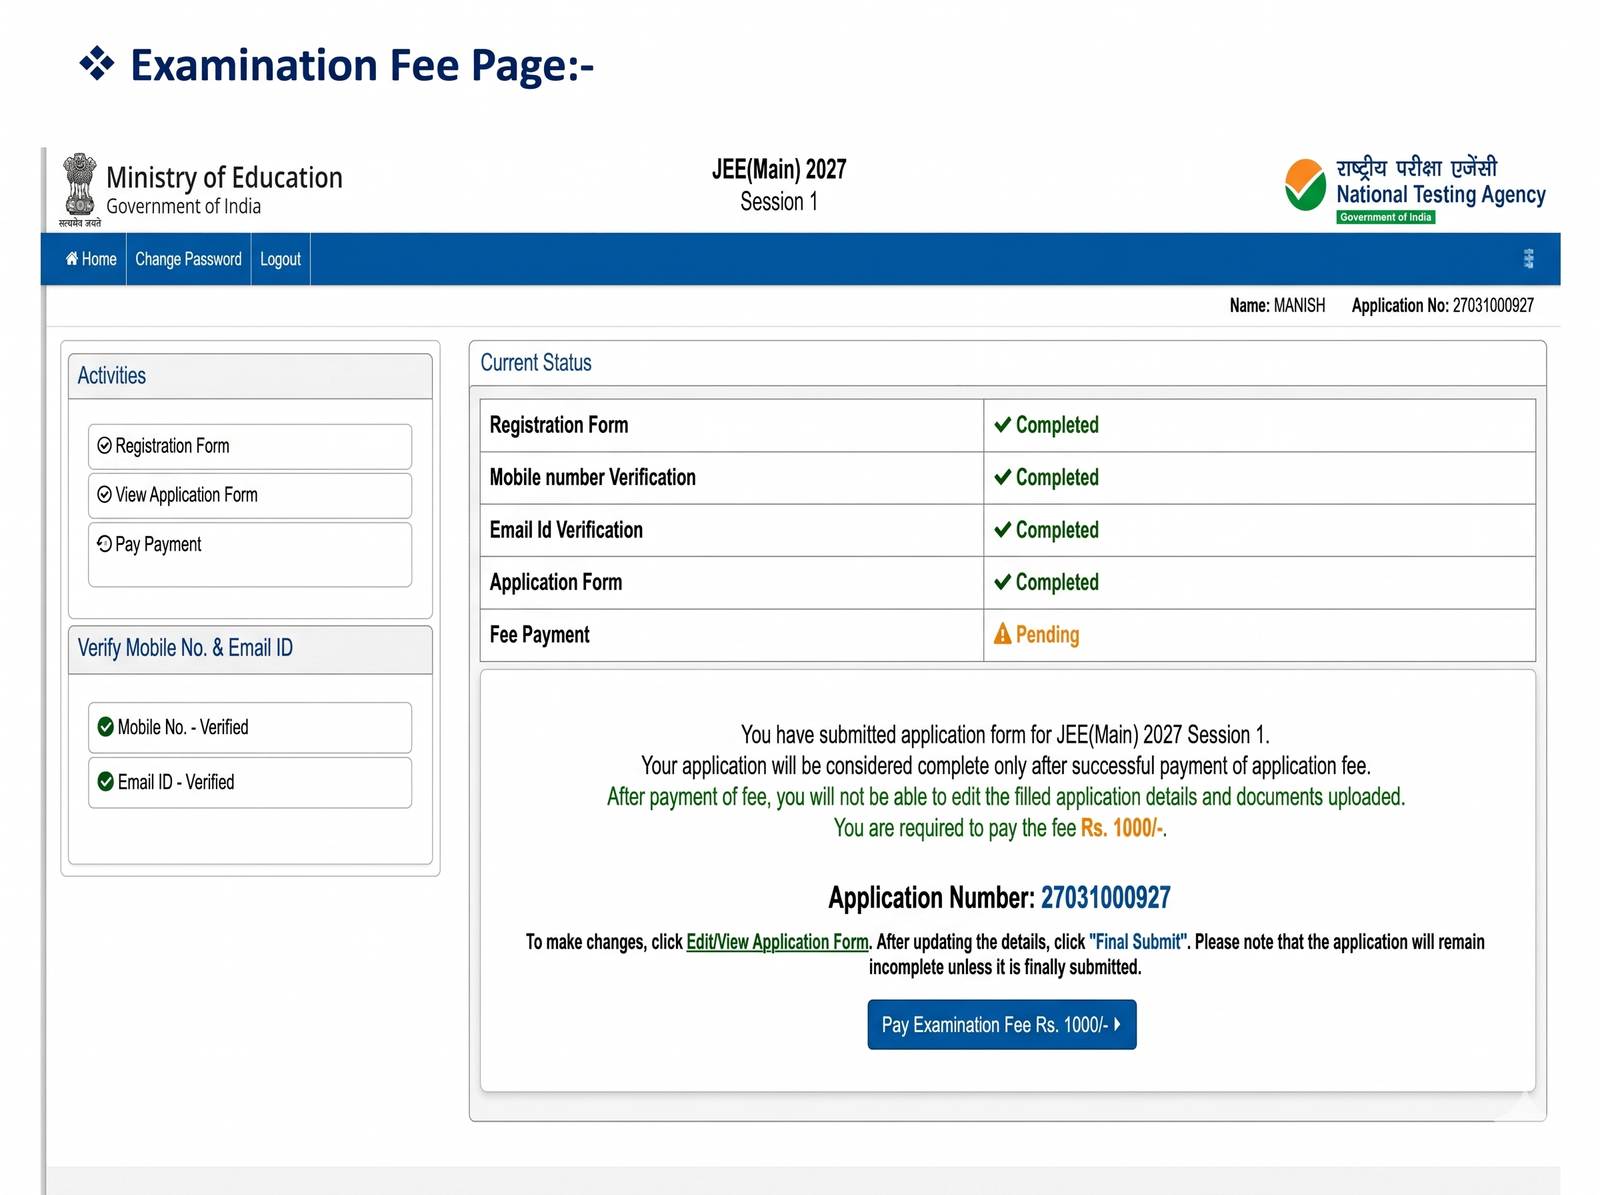
Examination fee payment portal tracking fee status and payment gateway options.
Conclusion: Securing Your JEE Main Journey
Completing the JEE Main registration form accurately is your crucial first step toward entering India’s premier engineering institutes. By paying close attention to every detail—from DigiLocker authentication and live photo capture to final fee payment—you protect your candidacy from administrative rejection. Take your time during each phase, keep digital copies of your confirmation page safe, and channel your full energy into your exam preparation.
Frequently Asked Questions (FAQs)
Q1: Is DigiLocker/Meri Pehchaan authentication mandatory for JEE Main registration?
While DigiLocker is the preferred and most seamless mode for authentication, NTA provides alternative identification options such as Aadhaar Number, Non-Aadhaar Passport, PAN Card, or Driving License.
Q2: What if my Category Certificate is not issued before the application deadline?
You must ensure that your Category Certificate (OBC-NCL, Gen-EWS, SC, ST) is issued by a competent authority as per current financial year guidelines. Refer to the official NTA Information Bulletin for details.
Q3: Can I edit my preferred examination cities after submitting the application fee?
No. Exam city choices locked at the time of final submission cannot be edited directly unless NTA opens a specific Application Form Correction Window.
Q4: What should I do if my live photograph capture fails via webcam?
If your computer webcam is not working or unsupported, you can scan the QR code displayed on the live photo capture page using your mobile phone camera to capture and upload your photo instantly.
Q5: Can I modify my personal details after making the fee payment?
Once the application fee is successfully paid, core personal details such as candidate name, date of birth, and mobile number are locked and cannot be edited. Minor corrections are allowed only during the official correction window.
Q6: How will I know if my application fee payment has been successfully received?
Upon successful payment, the fee status on your dashboard will update from "Pending" to "Ok" or "Completed", and you will be able to download the official confirmation page e-receipt.
Q7: Is it necessary to keep a printout of the confirmation page?
Yes, downloading and printing multiple copies of the final confirmation page is strongly recommended, as you will need it during subsequent stages like admit card download, exam entry, and counselling.